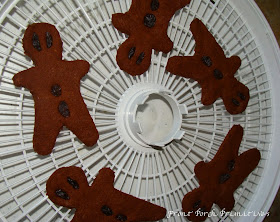
RECIPE-
3/4 cup cinnamon
1 cup applesauce
1 T. nutmeg
2 T. cloves
1 T. allspice
2 T. Elmer's Glue
raisins cut length wise
* flour as needed
Mix together and press onto lightly greased tin foil or waxed paper. Grease your hand and press to just over 1/4" thickness. Cut with cookie cutter. Press in raisins for eyes and buttons. Remove excess, re-press and re-cut. Lay flat to dry. Turn over several times during drying time. This will take several days. Or I recommend using a dehydrator.
There, now they are staring at you.
Now for the Fabric Balls. I really couldn't find a good tutorial with some pictures so I tried my hardest to do a good job with this one so everything makes sense to you. So here it goes.
ITEMS NEEDED-
1/2 yard fabric
scissors
styrofoam ball (optional)
old sheet (optional)
Note: If you don't want to use a ton of expensive fabric then I would cover a styrofoam ball or start your ball with an old sheet and switch to your nicer fabric at the end.
Lay your fabric flat. Measure 1/4" over from the edge and cut a slit 1 inch into the fabric.
Hold the fabric steady with your left hand and start ripping the strip up with your right. I will tear nice and straight. Stop tearing when you have 1/2" of fabric left before it tears right off. You are trying to make one continual piece of fabric strip so measure another 1/4" over from where you stopped and cut and tear, again stopping before it tears completely off. Repeat this process until you have one huge strip.
Untangle your pile and find an end.
Roll the end over itself and around your fingers 2 times.
Slide if off your fingers and pinch the middle.
Fold it in half: top toward bottom.
Start winding the fabric around itself to create a ball. I found going diagonally quite a bit helped out. Of course, winding it tightly will give you a smaller ball while winding it loosely will give you a larger one.
When you come to the end, slip about 1/2" under to secure it tight.
Whala.
Now I have pretty jars to look at. And one that's looking at me.


Hello, I'm so glad I found your blog! Thanks so much for the great tutorials on the gingerbread men and the fabric balls :) I've been blogging for just a little over a year and it's hard getting people to follow but the ones that do are amazing blogger friends! Welcome to blogland :D
ReplyDeleteHugs, Trish
hi, Steph~ love tutorials~ I want a gingerbread cookie now~ giggles~ thanks for sharing~ go to App forum~ I left you some info on your post about avatar & blog url~ If they stuff don't work on APP~ ask Dana~ she's a sweetie she'll help you out~ giggles( I stumble along~)
ReplyDeletehave a nice night~
smiles
Teresa
I love the idea of fabric balls- now I want to think of how to make them 'apply' to my house- thinking they would be cute in my girls room..somehow....
ReplyDeleteThanks!
Glad to have a prim friend in Idaho! Love the Blog - will be a follower!
ReplyDeleteThis comment has been removed by the author.
ReplyDeleteGreat tutorials ! Thanks for visiting my blog and for entering in my giveaway. Good Luck!
ReplyDeleteWow, fantastic tutorial. I made Gingers many years ago but I see they are coming back into the Prim/Country decorating fast a furious. They died out quite awhile back (I think it was in the 80's that they were real hot).
ReplyDeleteGlad they are popular again.
Karen