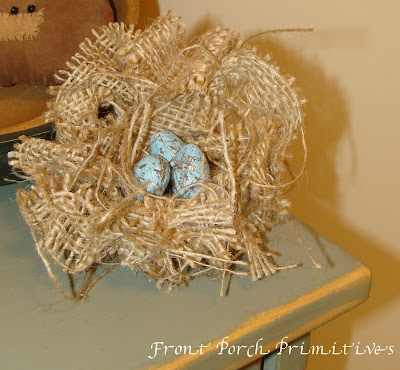
I have been searching for instructions on how to make a birds nest for a really long time. They all looked so pretty.....and complicated.....and messy. I saw some made of plaster and twigs, peat moss and glue, paper mache and grass, etc. So, you can imagine how excited I was when I stumbled across this one on pinterest (thanks Angie). Just burlap and wire. I went to the website and wasn't thrilled about the tutorial so I decided to try and make one that I could understand better myself. But, if you rather the one I looked at originally, it's right here.
~What you will need~
3 strips looser thread burlap 1 inch by 36 inches
3 pieces of floral wire 12 inches long
Hot glue
Secure your wire to the ends of the burlap strips. I tied mine too close to the edge here. They just ripped out, so I had to put it in further down.
Thread the wire throughout the strips so it is gathered like this.
To make the bottom of the nest, take one of the strips and shove the burlap tight together so it looks like this. Leave the left over wire hanging out.
Loop the remaining two strips to make a circle and secure.
Take one of the circles and place in on top of the bottom. With the left over wire "sew" it to the bottom. I did have to end up securing it further with a little hot glue. Work gently here because the burlap pulls apart very easily. Leave the left over wire sticking up again.
Repeat with the last burlap strip and secure with hot glue. Leave the parts that have frayed out to make it look more "nesty".
Now you are ready to fill it with some eggs. I didn't want to run to the store to search for small robin eggs so I made my own with this awesome baking soda clay recipe.
I hope you try this tutorial. I loved it because it only takes like a half an hour and they are so cute to fill up some small spaces.
Have a wonderful spring day.


11 comments:
Thank you Steph for this informative post! What kind of paint did you use on the clay/eggs? And how did you paint the little beige spots on the eggs?
Goedele
You make it look so easy! And it is beautiful. The eggs are beautiful, too. An awesome spring decoration!
Oh my that nest is fantastic and your robins eggs look perfect displayed inside..thank you for sharing these great tutorials..Hugs X
Steph,I love that nest and eggs!Thanks for the great tutorial!Hugs,Jen
I've seen them to Steph, but yours is so much cuter and what a great tutorial you put together! I've got burlap waiting for me. Might have to try this later today!
Have a great day~
hugz,
Sheila
Steph, I love this~ so prim perfect & you make it look so easy~ thanks for the tutorial~
enjoy the evening
smiles
Teresa
A great tutorial Steph! I really wish I had 2 usuable hands as I'd love to try this - they are so great for spring decorating.
Have a fun day!
Christine
Steph this is awesome thanks so much for sharing this ...I have a ton of grungy eggs left from show just what i needed was some nests to put them in :0) Have a great day hugs lil raggedyangie
Hi Steph--Great tutorial--who woulda thought !I just may have to try this one! Thanks for sharing it.--Jan
Thanks for the tutorial Steph!! Your nests and eggs look great! I will have to try this tomorrow since I am home alone :)
have a great night,
Trish
That is soo cute and awesome!!! I love the eggs, they look awesome
Post a Comment